Getting “a grip” (on MY back pain)
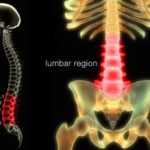
Low back pain is a common condition and one of the most frequent causes of disability in Western societies. The pain emerges from the lumbar region of the spine and slightly below (shown in red in the first image.) Patients who have had an imaging study of their spine (x-ray or MRI) learn that the location is usually around vertebrae L4/L5/S1.
This is not MY back pain! I have an unstable sacroiliac joint (commonly called SI joint.)
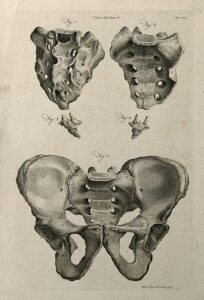
The sacrum is a shield shaped structure the size of a hand at the lower end of the spine. It consists of what were once separate vertebrae that have fused throughout the history of animal evolution (phylogeny) and throughout an individual’s lifetime (ontology). In humans the time of final fusion of S1-S5 happens between the ages 18 and 30. In many languages the sacrum is called the holy bone (in German also the cross bone). If you are nerdy about such things, like I am, I recommend the Wikipedia page.
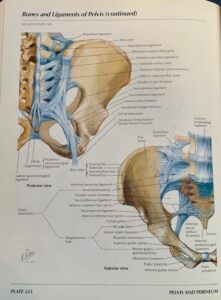
The sacrum has a joint on either side with the ilia. The ilia are two large bones, the main body of the pelvis, attachment sites for many large muscles. The sacrum and the ilia on either side of it are held together by massive structures of connective tissue (shown in blue in the image below.) Basically, this allows the SI joints to shape shift (think pregnancy.) On the other hand, the SI region can be thrown out of shape (by a fall or such) or twisted and tilted over time (by uneven use of our legs and torso, etc.).
My SI joint tends to “go out” during the most ordinary activities; making beds and vacuuming are likely examples. If such instability persists over the years, the severity and duration of the resulting pain tend to increase. One can compare the injury to twisting an ankle, causing a strain or sprain (i.e. injuring the connective tissues.) Once these connective tissues are overstretched in an injury, they become slightly less supportive; in addition, some people have looser tendons and ligaments because of their genetic disposition. However, the repeated experience has helped me to catch the onset of misalignment and pain early and counteract.
Just a few months ago I found MY magic trick. For many years I had already worked on ‘keeping my pelvis together’ instead of letting it loose and widen. I began to think of ‘togetherness’ instead of widening, thought of it as a ‘gathering’ all those supportive structures, called it ‘knitting together’, but images and words do not work for everybody the same way. Of course, when I teach a student with similar issues (and there are many people like me) I can use my hands to support the concept.
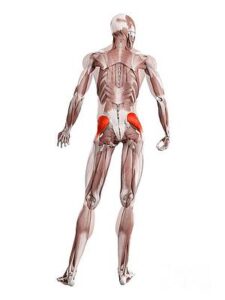
Recently I began to take my self-help approach to a muscular understanding. First I realized that walking almost always helps. So what happens in the pelvis musculature during walking? For most people the idea of gluteus muscles (“glutes”) elicits an image or sensation of the big butt muscles, which we can voluntarily squeeze and easily feel from the inside and with our hands on the outside. The glutes maximus plays an important role stabilizing hip and knee during standing and walking and assists the gluteus medius while standing on one foot.
That sounds sufficient, right? Squeeze your buttocks! I got more interested in the gluteus medius; smaller and below the big guy, gluteus medius stabilizes the pelvis during walking and standing on one foot.
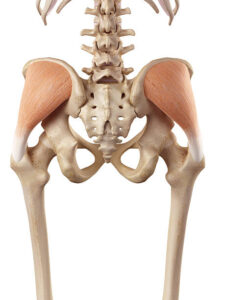
The gluteus medius has a broad origin on the outside of your pelvis bone, the ilium, and gathers fibers down to the outside of a big protrusion on your thigh bone, the bigger trochanter. This is very technical.
Maybe you can explore this better in an activity. Stand with your feet a little bit apart and shift your weight to one leg, so that you can balance on it and lift the other leg sideways off the floor. If you need help balancing, stay next to the back of a chair or a wall for support.
Gluteus medius is actively abducting your un-weighted leg sideways. Naturally, switch sides. (No need to do any of the extraneous affections demonstrated in the illustration below: arms don’t need to be involved, neither does the head need to turn.)
This might address your understanding and some action in the gluteus medius: it abducts the unweighted leg and supports the opposite active leg.
Once I discovered the muscles below the big glutes, I wanted to engage with them in many daily activities, sitting upright on a chair, standing, and most importantly, walking. Walking offers you the chance to briefly balance on one leg; and while you walk I encourage a bit of a squeeze that alternates between your left and your right back side, your left and your right standing and balancing leg.
And where does the Alexander Technique come in?
- Don’t do this as an exercise with multiple repetitions!
- Slow down and explore!
- Do not hold your breath!
- Do not pull down and tighten your neck!
- Find the muscles you do not want to work: Gluteus Maximus, pelvic floor, abdominals, diaphragm, intercostal muscles…

Actually, I don’t really understand this.”And where does the Alexander Technique come in?
Don’t do this as an exercise with multiple repetitions!
Slow down and explore!
Do not hold your breath!
Do not pull down and tighten your neck!
Find the muscles you do not want to work: Gluteus Maximus, pelvic floor, abdominals, diaphragm, intercostal muscles…” And I DO want to ask you for your thoughts on my cerebellar ataxia which plagues my balance and ability to walk. My sister Deb S. lives in Cheshire; maybe I’ll catch up w/ you someday! Hope your back pain gets better. Try hot peppers? :>)
Hello Bob,
Thank you for reading my blog and for engaging with its content.
My description of muscles and how to squeeze them to stabilize the pelvis could be understood as an exercise program. That is not what I am trained to do and it’s not what the Alexander Technique is about. I wanted to share my discovery of a muscle group that is a bit tricky to locate and how the journey has helped me tremendously. In lessons I can offer a more quiet mind body approach to physical demands. I hope that makes sense.
Working on balance is a part of my teaching with almost all students, the older we get, the more it becomes part of lessons. Over the years I also found that the most simple procedures of the Alexander Technique help symmetry and awareness and therefore balance.
Thank you Michaela – you have described all my joint problems so brilliantly – the physiotherapist had diagnosed piriformis problem but nobody, nobody listened to me when I kept saying that “it feels that the joint is coming out of place, dislocated, sometimes I can go up hill without pain and the next day I can only go down hill without pain. I have started doing the” togetherness”, the bridge is helpful – I am still struggling with sitting in front of the telly with my legs in front of me (I have varicose veins on top of all that). But thank you so much – I am very grateful.
R